Troubleshooting the 8 Most Common Resin 3D Printing Problems
Resin 3D printers are capable of producing incredibly detailed models for model railroads, from locomotives and freight cars to stations and industrial structures. However, even experienced users occasionally encounter failed prints. The good news is that most printing problems have only a handful of common causes. Once you learn how to recognize the symptoms, troubleshooting becomes much easier.
1. The Print Sticks to the FEP Film Instead of the Build Plate
This is one of the most common failures for beginners. The printer starts normally, but when the print finishes there is nothing attached to the build plate. Instead, a thin layer of cured resin is stuck to the FEP film in the resin vat.
Possible Causes
- Bottom exposure time too short
- Build plate not properly leveled
- Resin temperature too low (< 20°C)
| Symptom | Most Likely Cause | Solution |
|---|---|---|
| Print stuck to FEP |
1. Exposure time bottom layer too short. 2. Build plate leveling |
1. Double exposure time for bottom layers. 2. Re-Level build plate |
| Split model | Exposure time normal layer too short | Increase exposure of normal layers by 30% |
| Warped model directly during/after print. | Insufficient supports |
Improve support structure |
| Warped after 1-2 days | Model not dry before Post-Curing | Use pressurized air to blow off IPA after wash. Then leave to dry over night in ventilated area. |
| Brittle parts | Hard / High detail resin selected. |
Mix 30% Flexible resin with 70% of the Resin you are using. |
| White residue | IPA not dried |
Solution
Run a 10 seconds exposure over the entire print area. This feature is always available in the printer selection menu. Sometimes it´s also called "Clean up" or "VAT-cleaning". Once ready release VAT from printer and carefully push edge of exposed resin with your forefinger while removing it gently from the FEP with the plastic scraper. There are also 3D-models available which has the shape of a handle which can be put in the corner of the exposure area ahead of the 10 seconds exposure. It will bond to the cured resin during the 10 seconds exposure. Gently just lift the handle and the cured resin from the FEP will come off easy.
Prevent future occurence by
- Increase bottom layer exposure time in steps of 100% until problem is solved.
- Re-level the build plate according to the manufacturer's instructions (Most modern printers have auto-leveling).
- Keep resin between 20–30°C during printing (Many modern printers have built-in resin heaters).
2. Layer Separation
The model begins printing correctly but splits partway through the print. One section remains attached to the build plate while another remains attached to the FEP film. Sometimes the model remains intact in the print head, but surface is separated in layers.
Possible Causes
- Exposure time for normal layers too short.
- Lift speed too high.
- Weak support structure.
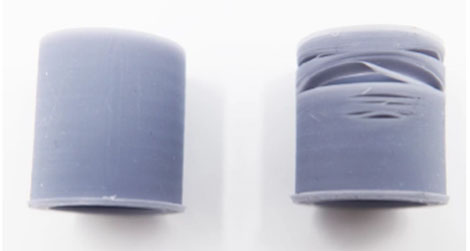
Left model is correct. Right model suffers from layer separation
Solution
Run a 10 seconds exposure over the entire print area. This feature is always available in the printer selection menu. Sometimes it´s also called "Clean up" or "VAT-cleaning". Once ready release VAT from printer and carefully push edge of exposed resin with your forefinger while removing it gently from the FEP with the plastic scraper. There are also 3D-models available which has the shape of a handle which can be put in the corner of the exposure area ahead of the 10 seconds exposure. It will bond to the cured resin during the 10 seconds exposure. Gently just lift the handle and the cured resin from the FEP will come off easy. Scrape the print head free from cured resin using the metal scraper.
Prevent future occurence by
- Exposure time too short. Increase exposure for normal layers in steps of 30% until problem is solved.
- Reduce lift speed. Check recomendations for resin / printer in datasheet.
- Add more supports.
3. Warping during print
Long walls, roofs and freight car bodies may bend or twist (warp). There is a difference between warping during print and warping that occours over time (typically 1 week to 2 months) after post-cure. More about the latter type below.
Possible Causes
- Bottom plate loose from print head in corner
-
Insufficient supports
- Poorly selected print angle
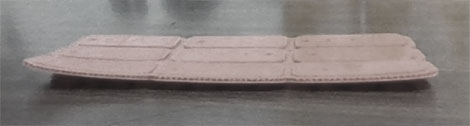
This model should be flat, but has warped.
Solution
There is no solution to fix a warped model. It can be heated and bent back, but will return to original warped shape over time.
Prevent future occurence by
- Make sure bottom plate sits firmly on print head. Increase exposure for bottom layers in steps of 100% until problem is solved.
- Improve support structure.
- Try other print angle.
4. Warping over time
Long walls, roofs and freight car bodies may bend or twist (warp). The model comes out perfectly straight from print, but starts warping over time (typically 1 day to 2 months) after post-cure.
This model should be flat, but has warped.
Possible Causes
- Model not properly dry before Post-cure.
-
Model not properly painted with surface primer.
Solution
There is no solution to fix a warped model. It can be heated and bent back, but will return to original warped shape over time. The bending process will also extends the sides making the model larger than designed.
Prevent future occurence by
- First use pressurized air to remove reamaining IPA from the surface of the model. Drops often remain in corners and holes. Then leave model to dry over night in a well ventilated area.
- Make sure to apply primer to both the inside and outside surfaces of the model. Most resin materials are sensitive to moisture to some degree and may expand over time if moisture is allowed to penetrate the surface.
5. Visible Layer Lines
Modern resin printers produce very fine layers, but visible stepping may still occur.
Possible Causes
- Layer height too large
-
Model orientation not optimized
- 3D-model not well designed for 3D-print
This model should be flat, but has warped.
Solution
Use 800-1200 grit sanding paper to remove layer lines if the layer lines are present on a flat non-structured surface.
Prevent future occurence by
- Reduce layer height from 0.05 mm to 0.03 mm.
- Rotate curved surfaces away from the build direction.
- Use anti-aliasing if supported by the slicer.
6. Brittle Parts
Highly detailed parts such as ladders, handrails and signal details may become extremely fragile.
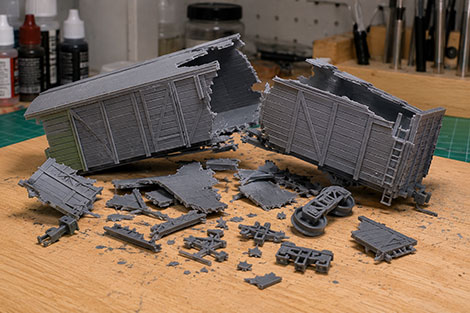
This model broke in 1000 pieces when dropped on to the table.
Possible Causes
- Resin formulation.
-
Excessive curing.
Solution
There is no way to improve material strength once the part has been printed.
Prevent future occurence by
- Use a mix of 70% ABS-like resin and 30% Flexible or Tenasious resin.This will result in excellent details and durable parts.
- Recommended Post-curing is 4 minutes.
7. Support Marks on Visible Surfaces
After removing supports, visible scars remain on walls or roofs.
Possible Causes
- Supports attached in highly visible areas
-
Supports too large
This model should be flat, but has warped.
Solution
Use 800-1200 grit sanding paper to remove support marks.
Prevent future occurence by
- Place supports on hidden surfaces.
- Use smaller support tips.
- Sand lightly before priming.
8. Random Print Failures
A model that previously printed successfully suddenly starts failing.
This model should be flat, but has warped.
Possible Causes
- Damaged FEP film.
-
Dirty LCD screen.
-
Old resin.
-
Loose build plate.
Solution
There is no way to recover a failed print fully. Run a 10 seconds exposure over the entire print area. This feature is always available in the printer selection menu. Sometimes it´s also called "Clean up" or "VAT-cleaning". Once ready release VAT from printer and carefully push edge of exposed resin with your forefinger while removing it gently from the FEP with the plastic scraper. There are also 3D-models available which has the shape of a handle which can be put in the corner of the exposure area ahead of the 10 seconds exposure. It will bond to the cured resin during the 10 seconds exposure. Gently just lift the handle and the cured resin from the FEP will come off easy. Scrape the print head free from cured resin using the metal scraper.
Prevent future occurence by
- Inspect and replace damaged FEP film.
- Clean LCD and resin vat.
-
Filter old resin.
-
Check all mechanical fasteners.
Final Thoughts
Most resin printing problems can be solved without replacing hardware or changing printers. In many cases the solution is as simple as improving supports, adjusting exposure settings or ensuring the resin is warm enough before printing.
Patience is one of the most valuable tools in resin printing. A failed print is rarely wasted time if it helps identify a problem and improve future results.
With a properly calibrated printer and good printing practices, resin printers are capable of producing highly detailed model railroad structures, rolling stock and accessories that rival commercial injection-molded kits.