Planning a New Model Railroad
Building a model railroad is one of the most rewarding projects in the hobby. It can also be one of the most frustrating if important decisions are postponed until construction has already begun. Many layouts are rebuilt, heavily modified or abandoned simply because the planning phase was rushed. A little time spent thinking about goals, operation and available space can save hundreds of hours later. This article presents a simple five-step planning process that can be used for layouts of any size, from a small shelf layout to a large basement empire.
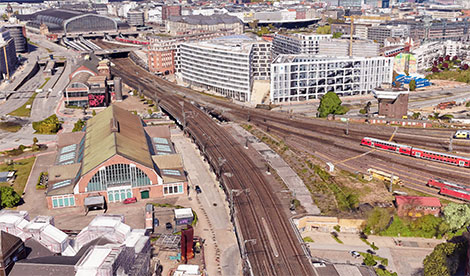
Hamburg Hbf in Germany - Modern Era (2024)
Step 1 – Select Your Prototype
The first decision is determining what type of railroad you want to model. For some hobbyists the prototype is the most important factor. They may want to recreate a specific railway line, station or region exactly as it appeared during a certain period of time. Others are more interested in operations than strict prototype accuracy. In that case the prototype serves mainly as inspiration while the layout is designed around the activities the owner enjoys most.
At this stage it is useful to create a priority list of the features you would like to include thinking about activities rather than tracks. Instead of asking: "Where should the tracks go?" Ask: "What do I want to do on the railroad?"
For example, a layout might include:
- Large passenger station
- Freight yard
- Harbor
- Branch line
- Engine facility
- Industrial sidings
- Long mainline runs
- Mountain scenery
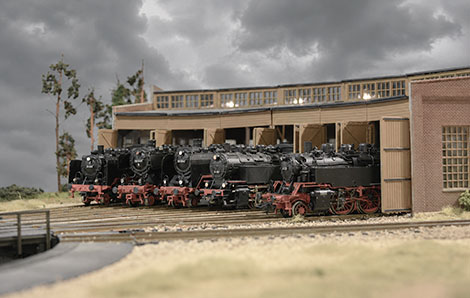
The 6-port Roundhouse crowns the engine facility on the layout
Most layouts cannot include everything, so deciding what is most important early in the process helps guide later decisions.
Step 2 – Decide How Trains Will Operate
Before drawing any track, think about how you want to run trains. Many newcomers focus entirely on scenery and structures while giving little thought to operation. Yet operation is often what determines whether a layout remains enjoyable for years to come. Some model railroaders enjoy watching passenger trains circle the layout automatically. Others prefer operating freight trains, switching industries and building trains in yards. Typical operating styles include:
At this stage it is useful to create a priority list of the features you would like to include.
Examples might be:
- Continuous Running: Trains circle the layout while the operator enjoys watching them pass through the scenery.
- Point-to-Point Operation: Trains travel between two destinations and perform switching along the way.
- Walk-A-long Operation: Popular on many North American layouts, this style involves following a the train around the layout.
- Timetable Operation: Multiple operators run trains according to schedules and dispatcher instructions.
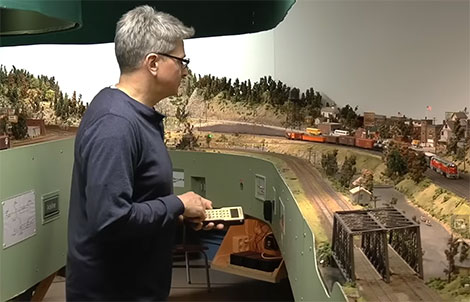
Walk-a-long operation. The driver walks with the train as it travels around the layout.
Understanding which operating style appeals to you is one of the most important planning decisions. Most layouts cannot include everything, so deciding what is most important early in the process helps guide later decisions.
Step 3 – Choose the Basic Layout Shape
The room often determines what is possible. Common layout configurations include:
- Around-the-wall layouts
- Peninsula layouts
- Island layouts
- Linear point-to-point designs
- Multi-deck layouts
It is tempting to focus on maximizing track length, but operator access is usually more important. Aisles should generally be at least 700 mm wide if more than one person will be operating the railroad.
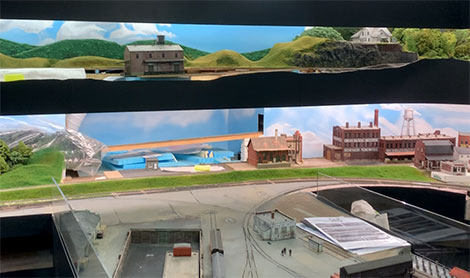
Kathy Millats multi-deck layout with Harbor peninsula
Likewise, reach distances should be kept reasonable. Areas that are difficult to reach will eventually become maintenance headaches.
Step 4 – Fit the Design to the Room
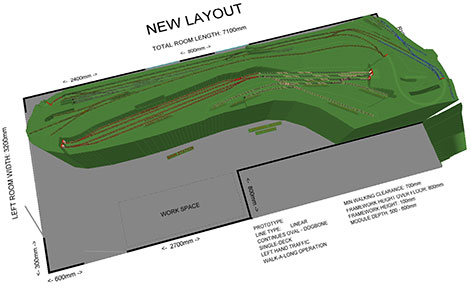
Once the basic concept has been selected, it is time to create a room sketch. Make a grid in the sketch representing the tightest curve radius you can accept, example 520mm. Based on this you can now easily see how much of your dream layout actually will fit inside the available room. You can now also start placing the track components (stations, yards, industries and long streched main lines) you selected from the prototype. Play around with the components and adjust the curve radius until it fits inside the room. Many ambitious plans disappear during this stage when the available room is compared to the desired track arrangement. While this can be disappointing, it prevents costly mistakes later.
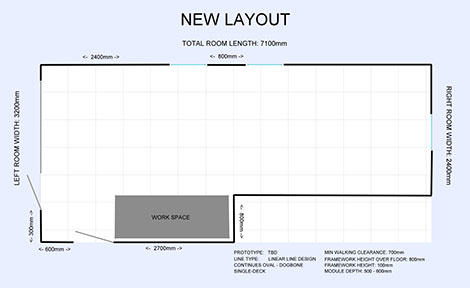
Room sketch with squares representing the minimum curve radius
Mark:
- Doors
- Windows
- Heating systems
- Electrical panels
- Workbenches
- Storage areas
Many layouts fail because every available square meter is filled with track while practical needs are forgotten. If you plan to build structures, scenery, take photos or produce videos, reserve space for those activities from the beginning. It is much easier to allocate workshop space during planning than to find room for it later.
Step 5 – Develop the Track Plan
Only after the first four steps are complete should detailed track planning begin. Track planning software such as AnyRail, SCARM or WinTrack can simplify the process considerably. However, pencil and paper work equally well.
Establish Design Rules
Every layout benefits from a few design rules. Examples include:
- Minimum aisle width of 700 mm
- Minimum curve radius of 420mm
- Maximum grade percentage of 3%
- Maximum reach distance of 800mm
- Standard framework height 900mm
These rules help maintain consistency and prevent compromises that may cause problems later.
3D view inside Anyrail track planning software for Windows PC
For larger layouts, a framework height of approximately 800 mm or more generally provides comfortable access underneath for wiring and maintenance.
Room for friends and comfortable working height are important factors
Prototype vs Practicality
One of the most common mistakes is trying to reproduce everything from the prototype. Real railroads often occupy enormous areas that simply cannot fit into a model railroad room. Compression is necessary. The goal is not to reproduce every track but rather to capture the feeling and operational characteristics of the prototype. A small but well-designed harbor can convey the atmosphere of a major port. Likewise, a compact yard can provide enjoyable operations without occupying half the room.
Accept That Ideas Will Change
Track plans evolve. Almost every successful layout undergoes multiple revisions before construction begins. This is normal and should be encouraged. It is far easier to move a turnout on a computer screen than after glued and ballasted on the layout. Don't be afraid to experiment with different arrangements before committing to construction.
Conclusion
Successful model railroads are rarely the result of luck. They are usually the result of careful planning and clear priorities. By selecting a prototype, defining operating goals, choosing an appropriate layout shape, fitting the design to the available room and only then developing the track plan, you greatly increase the chances of building a railroad that remains enjoyable for many years. Remember that the goal is not to build the largest possible layout. The goal is to build a layout that supports the trains, scenery and operations that you personally enjoy most.
/ Martin