| - MRR TUTORIALS - TRACKWORK - GOTHENBURG | [ SITEMAP] |
| GOTHENBURG 1963 A tribute to my new home town! |
 |
| LAYOUT INFO | ||
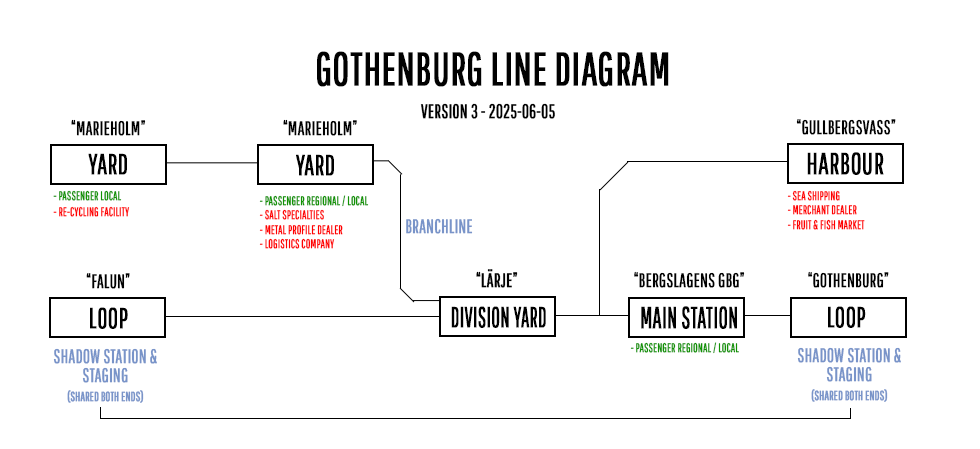
| - SIZE: 6,5 x 2,1 meter | - TRACK LENGTH: 98 METER | - MAIN STATION: BERGSLAGENS GÖTEBORG |
| - TRACKS: MÄRKLIN K | - TURNOUTS: 45pcs | - MAIN YARD: GOTENBURG NORTH |
| - TRAFFIC: LEFT HAND TRAFFIC | - TRAIN STORAGE: SHADOW STATION | - HARBOUR: GULLBERGSVASS |
| - TYPE: OVAL DOGBONE | - CONTROLLER: MARKLIN CS3 + RocRail | - PROTOTYPE YEAR: 1963 |

New inserts on top, older further down the page
[2025-05-23]
BLOCK SECTIONS AND TRACKS FOR TRAIN STORAGE
In the first of these two videos (below) I explain how I plan, build and configure the block sections on the model railway. How to dimension the length and how the passage of the trains is detected. In a later video I will also show how the signals are connected to these block sections.
The second video (on the right) explains what all the tracks in the train depot work and are intended for. Partly the fully automatic ones and partly the manual.
[2025-03-30]
BENCHWORK COMPLETED AND TRACKS ASSEMBLED
In the two videos here I mount neccesary components to make the Model Railroad possible to move using a standard pick-up truck.
BUILDING A VALANCE WITH SOUND DAMPING AND ILLUMINATION
In this video I build and assemble the stuff that need to be installed in the ceiling before the actual layout construction of the model railway can begin.
The valance is built in wooden frames that are filled with sound-absorbing material. This is necessary to reduce room echo and to be able to run several trains with sound decoders at the same time. You gain a lot of light on the landscape surface by placeing illumination at the bottom of the valance. This is because the strength of the light decreases with the square of the distance. With this assembly, we get aproximately four times more lightcompared to an assembly in the ceiling. More useful information about how to illuminate your model railway is found in the video below.
Snap-shots från videon:
 |
 |
 |
[2025-02-21]
BENCHWORK COMPLETED 
Benchwork completed. Note the two red-striped divisions which will enable me to disassemble and move the layout .
This video explains how I designed the framework and also how I then built it for the model railway. The design tools I use are Anyrail (track planning), Fusion360 (CAD software). The material is pine plywood in the following thicknesses: 16mm, 12mm and 4mm..
[PUBLISHED 2025-01-10]
/ Martin
Snap-shots from the video:
 |
 |
 |
ADDING REAL-LIFE ENVIROMENTS TO THE LAYOUT
This video explains how you can add real-life enviroments after you have chosen which track parts you want on your model railway.
In the video, I go out with Alex to Gothenburg's industrial areas and collect photos and inspiration to build a model at home. In connection with this, I adapt the track plan to fit the chosen areas.
[PUBLISHED 2024-11-15]
/ Martin
Snap-shots from the video:
 |
 |
 |
This video explains the order in which you should plan a new model railway and what things you should consider when planning. If you are building a simpler railway, you can just remove the things that do not apply to your build, but the 5 steps will help you always include all the important pieces in the planning. This is regardless of whether you spend 20 minutes planning or 18 months.
[PUBLISHED 2024-10-25]
//
Martin