|
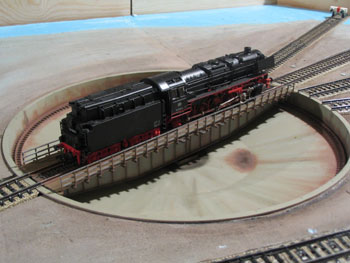
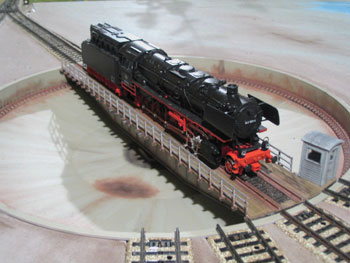
Modifying
a Cornerstone 2-rail Turntable to 3-rail
Many thanks to Pierre GILLARD who inspired me and led the
way to to make this kit conversion.
It took me about 15 hours to complete the conversion including
the mating tracks and saved me over 200 Euro, compared to
buying a Märklin turntable. More fun, more special, less
cost!
The kit:
http://www.walthers.com/exec/productinfo/933-3171
Pierre GILLARDs conversion
article
I started to paint all the parts in the kit as follows:
Humbrol #110 Natural wood - Ground colour for the deck
Humbrol #113 Rust - Weathering of pit, rails & bridge structure
Humbrol #33 Black - First drybrush layer on deck & rails. Second layer drybrush on the house and pit.
Humbrol #64 Gray - Ground colour for the house, bridge structure, motor & support bars
PollyScale F414317 Concrete - Ground colour in the pit.
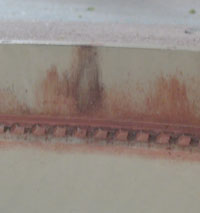
Detail of weathering of the pit rail
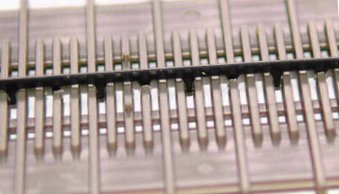
Drill and cut in the deck to fit the centre rail Adding two centre conductor rails from M-rail 5106 track to the deck
I carefully removed the two centre rails from its track and placed them upon the deck and marked the positions; where there were need to cut slots. Surprisingly not many holes were needed actually, since most of the point contacts went through in the spaces between the planking. I then drilled holes using a 1,5mm drill where holes were needed. It was also necessary to grind down two of the point contacts on each centre rail in order to make them fit properly. I also grinded down the lower ends of the centre rails so they later more easily can be fitted on the bridge.
Soldering cables to the rails
I soldered cables to connect the two centre rails with each other and also a lead-out for feed. I then mounted the rails in position on the deck and added small amounts of CA glue to keep it in place until final assembly on the bridge structure.
Adding Roco code 100 rails to the
deck
Since I'm using Märklin M-rail
I need a rather tall rail profile to get the same height on
the deck as on the mating 5106 modified track sections. Best
for this purpose was a Roco code 100 flexitrack section.
I cut away the rails using a razorblade.
Next thing was to solder feed cables from both of the rails.
After that I simply just glued them on the deck using CA glue.
I didn't care too much about getting the exact distance between
the rails, since they were sitting quite tight in the space
for the rails in the deck.
In order to get support for the centre rail and also room for the centre rail it was necessary to cut a 1mm wide slot in the centre of the bridge bracing. I simply set up a Dremel tool in my drilling machine and let the bridge slide pass, cutting a straight slot over the whole length of the bridge. I checked that I got a proper fit of the deck with its centre rail.
Building the kit
The rest of the kit was built according
to the instructions that came with the kit. Not so many parts,
very easy work really.
Cleaning of brass contact rings and
springs
It is necessary to clean the contact
rings and springs with Isopropanol, or Acetone to achieve
proper contact after the assembly is completed.
Converting mating M-tracks
The track sections which will interface
with the turntable have to be somewhat modified. This is necessary
since the pit sides require the rails to be 6mm longer than
the track bed on a normal 5106. I simple broke off the spring
contact on one side of the centre conductor rail. Thereafter
I fixed it gently in a skruvstycke and used a vinkelslip to
cut the trackbed. After the track bed was cut away I finished
the work by griding manually with a fine grinder.