


Building 3D-Printed Structures for the Model Railroad

3D printing has changed the way we can build structures for the model railroad. Instead of being limited to the buildings available as commercial plastic kits, a downloadable 3D model can be printed whenever it is needed, modified through different options and often reproduced several times at very little additional cost. This is particularly useful when building residential areas, industrial districts or railway facilities where several buildings of a similar architectural style are required. Real neighborhoods are rarely made up of completely unrelated houses.
The same basic designs are often repeated, but with different colors, extensions, dormers, entrances and other modifications. The same principle can be used very effectively on a model railroad. In this article we'll follow the construction of a Scandinavian villa and use it to look at the complete process of building resin 3D-printed structures – from the printer to a painted, weathered and illuminated building ready for the layout.
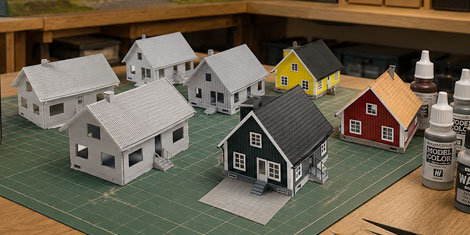
Villas in different variations for an entire neigborhood.
Printing in One Piece or as a Kit?
There are two basic approaches to printing a building. The first is Print in One Piece, where the walls and most of the main structure are combined into a single model. After printing, relatively little assembly is required. For smaller structures this can be a very convenient solution, and resin printers can reproduce surprisingly fine architectural details. However, large one-piece prints can be challenging. Large horizontal surfaces require good support, and dimensional changes during printing and curing can result in deformation. Gutters, roof edges and other projecting details can also be difficult to support properly. For this reason, a conventional kit consisting of separate walls, roof sections, windows and details is often the safer alternative for larger buildings. It also makes painting considerably easier because every component can be painted separately before assembly. If both alternatives are included with the model, it can be worthwhile trying the one-piece version first. If your printer handles it successfully, you save considerable assembly time.
Materials Used
- Resin 3D printer and suitable resin
- 3D-printable building files
- Surface primer
- Acrylic paints + Water
- Modelling putty
- Fast-setting model adhesive
- Transparent plastic sheet for windows
- PVA glue
- Pastel chalks
- Printed interior textures
- SMD LED and suitable resistor
- Fine electrical wire
- Figures and interior details
Cleaning and Post-Curing Resin Parts
Fresh resin prints must be thoroughly cleaned before painting or assembly. Any uncured resin remaining on the surface can ruin the paint finish and should not be allowed to remain on the model. Follow the cleaning procedure recommended for the resin and printer you are using, and wear suitable protective gloves when handling uncured resin. Supports should preferably be cut away rather than simply torn from the model. This is particularly important around fine architectural details. Pulling a support away can remove a piece of the actual model with it. After cleaning, allow the components to dry and post-cure them according to the recommendations for your particular resin. Before continuing, inspect all the components. It is much easier to repair a damaged edge or discover a missing component now than halfway through assembly.
Priming the Parts
Priming resin parts is highly recommended. Primer provides a good surface for the following coats of paint and makes small printing imperfections easier to discover. A neutral grey surface primer works particularly well because it also makes architectural details easy to see. Apply several light coats rather than attempting complete coverage with one heavy coat. It is generally also useful to paint both sides of larger flat components where practical. Resin parts can sometimes distort, and balanced coatings on the two sides can help reduce dimensional problems.
Painting Before Assembly
One of the major advantages of printing a building as separate components is that almost everything can be painted before it is assembled. For the Scandinavian villa in this example, the walls were painted in traditional red and yellow variations, combined with white corner boards and window frames. The tiled roof received a classic orange-red color, while the foundation was painted concrete grey. Windows, doors, gutters and railings were painted separately.
Try to avoid painting surfaces that will later be glued together. Adhesive generally forms a stronger joint directly against the resin than against a layer of acrylic paint. The objective at this stage isn't weathering. Concentrate on producing clean, even basic colors. We can make the building look older and more realistic after assembly.

Painting of the 3D-printed parts can be made using brushes or spray cans.
Adding Window Glass
Transparent sheet plastic is an inexpensive material for window glazing. There are two ways of installing it. Individual pieces can be attached to the back of each window frame before the frame is installed. This works well, but requires quite a lot of small pieces. An easier method is to install the window frame first. Place a larger piece of transparent plastic behind the opening, mark the required dimensions and cut it to size. The glazing can then simply be pushed into position from behind and secured with a tiny amount of canopy adhesive. Be particularly careful not to get glue onto the visible part of the glazing.

Weathering turns the 3D-printed building into a life-like model.
Correcting Warped Parts
Large thin flat resin components can occasionally become slightly curved or warped. The exact behavior depends on the resin, printing process, curing and environmental conditions. Slightly distorted parts can often be corrected by careful, gentle heating until the material becomes somewhat flexible. The component can then be bent slightly beyond its correct position and allowed to cool flat. This needs to be done cautiously. Too much heat can permanently damage the component or fine details. However, the part will always try to go back to it´s warped shape over time, but will be prevented to do so when glued together with other parts. If you regularly print architectural models, warping / distortion is prevented through good printing orientation, correct supports, quick drying process ahead of post curing.
Weathering the Roof and Walls
A freshly painted model usually looks far too clean. For tiled roofs, a diluted dark acrylic wash is a simple way of emphasizing the individual tiles. The wash collects naturally in the recesses and reduces the bright appearance of the original paint. The same principle can be used around doors and windows. Apply the wash and then remove most of it from the raised surfaces with a cotton swab. Dark color remains in the joints and recesses without making the whole building look dirty. Pastel chalk is another excellent weathering material. Light grey chalk powder brushed downward from the ridge creates subtle streaks across the roof and highlights the surface texture. Weathering doesn't necessarily mean making a building filthy. Often the objective is simply to remove the uniform, freshly painted appearance.
Create Variations
One of the most interesting possibilities with downloadable buildings is repetition. A single basic house can be printed several times, but that doesn't mean every building has to look identical. Change the wall colors. Add a dormer to one building and leave it off another. Use a patio or extension on a third. Change doors, details and weathering. This actually reflects reality surprisingly well. Residential developments frequently contain houses constructed from the same basic plans but customized by their owners over the years. Instead of sixteen completely different buildings, sixteen variations of related architecture can create a much more believable neighborhood.

A good 3D-model set offers several possible variations.
Adding an Interior
An illuminated house becomes considerably more convincing when there is something behind the windows. Fortunately, a complete three-dimensional interior is rarely necessary. Floors and wallpaper can simply be printed on ordinary paper, cut out and glued onto the removable floor and interior walls with PVA glue. Pictures of doors, clocks, furniture and other interior details add further depth. Only rooms that can actually be seen through illuminated windows need detailing. Adding a figure close to a window is another very simple trick. A silhouette or person looking through the window immediately makes the building feel inhabited.

Warm White LEDs gives the correct illumination inside the building.
Adding Interior Lighting
Small SMD LEDs are ideal for structure illumination. They are tiny, inexpensive and can easily be hidden above an interior ceiling. Always use the correct resistor and electrical arrangement for your particular LED and power supply, and test the LED before permanently installing it. The LED can be mounted above the room rather than directly in the viewer's line of sight. Wires can then pass through interior partitions and through a hole in the base plate to the underside of the layout. Selective illumination usually produces a more convincing result than lighting the entire building. One or two illuminated rooms surrounded by dark windows suggest that people actually live there.
The Finished Building
The result is a structure that combines the precision of digital manufacturing with traditional model-building techniques. 3D printing creates the walls, windows, roof and fine architectural components, but printing is really only the beginning. Painting, glazing, weathering, interiors, figures and illumination are what transform the printed resin into a convincing miniature building.
Perhaps the greatest advantage is flexibility. Once you have acquired or designed the digital model, it remains available whenever another building is needed. There is no need to wait for a manufacturer to produce another batch, and printing additional copies generally costs only the material consumed. For larger residential or industrial scenes, the ability to produce several related variations from one basic design is particularly useful. Instead of filling the layout with unrelated commercial kits, you can create an entire district with a consistent architectural character – while still making every building look slightly different. And that is where 3D printing becomes much more than simply another way of making a model. It becomes a very practical tool for building the world around the railway. A downloadable building can be printed again whenever you need another structure.
Look for model sets containing alternative roofs, dormers, extensions and other options – these make it possible to build several individual-looking structures while maintaining a consistent architectural style across your layout.
/ Martin T